
Why Gardeners Start Seeds Indoors
If you’re new to gardening, you might be wondering: why do gardeners start seeds indoors when you can simply buy plants from a garden centre?
It’s a fair question. While purchasing seedlings is convenient, starting your own seeds indoors offers several advantages that go far beyond saving a little money, and this article, How to Start Seeds Indoors: A Simple Beginner’s Guide to Growing Strong Garden Seedlings, is going to answer all your questions.
Growing More Varieties
One of the biggest reasons gardeners start seeds indoors is the ability to grow a much wider variety of plants.
Most garden centres carry popular and reliable plants, but their selection is often limited to common varieties. When you start seeds yourself, you can grow heirloom vegetables, unique herb varieties, or specialty peppers that are rarely available as transplants.
Starting seeds indoors opens the door to experimenting with different crops and discovering varieties that thrive in your garden.
Save Money
Starting seeds indoors does take a little time and planning, but it can save you a significant amount of money in the long run.
A single packet of seeds often costs about the same as one plant from a garden centre, yet that packet may contain dozens of seeds. With just a few seed packets, you can grow an entire garden for a fraction of the cost of buying seedlings.
If you don’t need all the seeds in a packet, consider splitting them with a friend or neighbour. This is a simple way to save even more money while sharing the excitement of planning a garden together.
Extend the Growing Season
For many gardeners, the biggest benefit of starting seeds indoors is the ability to extend the growing season.
By starting seeds early indoors, you give plants a strong head start before they are moved outside. This is especially helpful in cooler climates where the outdoor growing season can be short.
Starting seeds indoors also gives you more control over your planting schedule. Instead of everything ripening at once, you can plan your garden so that different crops are ready to harvest at different times throughout the season.

The Best Seeds to Start Indoors for Beginners
When you are new to starting seeds indoors, it helps to begin by looking at what you already plan to grow in your garden. This makes it easier to determine which crops should be started indoors and which ones are better planted directly in the garden.
If you are completely new to gardening, start by making a list of the vegetables, herbs, and flowers you would like to grow. From there, narrow your list down to the crops that have the longest maturity time. These are usually the plants that benefit most from being started indoors because they need a longer growing season to produce well.
Starting these seeds indoors gives them a head start and allows you to transplant strong seedlings into your garden once the weather warms up.
Not All Seeds Should Be Started Indoors
While many plants benefit from starting indoors, some crops actually grow best when they are directly sown into the garden.
Root crops in particular do not transplant well because disturbing their roots can affect how they grow. Fast-growing plants also tend to do better when planted directly in the soil.
Some common vegetables that are usually direct sown include:
- Carrots
- Corn
- Lettuce
- Spinach
- Pumpkins
- Zucchini
- Cucumbers
If you are ever unsure whether a plant should be started indoors or direct sown, the seed packet will usually provide clear planting instructions.
Easy Vegetables to Start Indoors
Some vegetables are especially well-suited for starting indoors. These crops typically need a longer growing season and transplant well once the weather warms up.
Here are some of the easiest vegetables for beginners to start indoors:
- Peppers (sweet and hot varieties)
- Tomatoes
- Broccoli
- Cauliflower
- Eggplant
- Celery
- Cabbage
Starting these vegetables indoors allows them to grow strong roots and healthy stems before being moved outside.

Herbs and Flowers That Grow Well Indoors
Many herbs and flowers can also be successfully started indoors, giving them a strong start before transplanting them into the garden.
Some great options include:
- Basil
- Parsley
- Chives
- Oregano
- Lavender
- Thyme
- Rosemary
- Mint
- Sage
- Lemon Balm
- Chamomile
- Holy Basil
- Calendula
- Yarrow
- Marigolds
Starting herbs and flowers indoors can help them establish earlier in the season and often results in stronger plants once they are transplanted outside.
To make planning even easier, I’ve created a printable seed starting chart that lists vegetables, herbs, and flowers along with their recommended indoor start dates or direct sow dates based on a mid-May last frost date.
This chart is perfect to keep in your garden journal or seed box while planning your garden each spring.
Your Printable Seed Starting Chart
You can download and print it here:
The printable includes:
- vegetables
- herbs
- flowers
- indoor seed starting dates
- direct sow dates
- transplant timing
All based on a May 15 last frost date, which is common for many northern climates.
Supplies You Need to Start Seeds Indoors
When you start seeds indoors, there are a few basic supplies you’ll need to help your seedlings grow strong and healthy.
While there are many tools and gadgets available for seed starting, you don’t need to buy everything right away. If this is your first year starting seeds indoors, it’s best to keep things simple and focus on the essentials. As you gain experience, you can always expand your setup and add tools that make the process easier or help solve problems you encounter.
Starting with a simple setup keeps the cost low while still giving you everything you need to grow seedlings successfully.

Seed Starting Containers
The first thing you’ll need is a container to plant your seeds in. Many gardeners use seed trays with small individual cells, but there are plenty of other options as well.
You can use:
- seed trays
- small nursery pots
- yogurt containers
- egg cartons
- soil blocks
If you choose to reuse household containers, make sure they have drainage holes so excess water can escape. Good drainage is important because seedlings do not like sitting in overly wet soil.
Why Seed Trays Are a Great Option
Seed trays are one of the most popular options for starting seeds indoors because they are affordable, efficient, and easy to reuse year after year. A single tray can hold dozens of seedlings while taking up very little space, making them perfect for windowsills or shelves under grow lights.
Most seed trays are designed with small individual cells, allowing you to start many different plants at once while keeping their roots separated. This makes transplanting much easier later on.
Another advantage of seed trays is that they are often sold as part of a complete seed starting system that includes a base tray and a clear plastic lid.
Why Lids Are Important for Seed Starting
Many seed trays come with a clear plastic lid, sometimes called a humidity dome. These lids are very helpful when starting seeds because they trap moisture and create a warm, humid environment that encourages germination.
Seeds need consistent moisture to sprout. Without a lid, the soil can dry out quickly, especially in a warm house during the winter months. The lid helps retain humidity, keeping the soil evenly moist while the seeds are germinating.
Once most of the seeds have sprouted, the lid can be removed so the seedlings receive better airflow and stronger light.
Because seed trays are sturdy and easy to clean, they can typically be used for many seasons, making them one of the most cost-effective tools for starting seeds indoors.
Choosing the Best Seed Starting Soil
The type of soil you use can make a big difference in how well your seeds germinate and how healthy your seedlings grow.
While it may be tempting to scoop soil from your garden, regular garden soil is usually too heavy and compact for delicate seedlings. It is also probably still buried under snow if you live in a northern climate like we do.
Instead, it’s best to use a seed starting mix, which is specially designed to help seeds germinate and develop strong roots.

What Is Seed Starting Mix?
Seed starting mix is a lightweight growing medium made to hold moisture while still allowing excess water to drain away. This balance is important because seeds need consistent moisture to germinate, but too much water can lead to problems like mold or damping off.
Most seed starting mixes are made from ingredients such as:
- peat moss or coconut coir
- vermiculite
- perlite
These materials create a light and airy texture that allows young roots to grow easily through the soil.
Because seed starting mix is sterile and finely textured, it provides a clean environment that helps reduce the risk of disease during the early stages of growth.
Seed Starting Mix vs Potting Soil
You may notice that seed starting mix and potting soil look similar, but they are designed for different purposes.
Seed starting mix is usually lighter and finer, which helps small seeds germinate easily. Potting soil, on the other hand, often contains larger pieces of organic material and nutrients that are better suited for mature plants.
While potting soil can sometimes be used in a pinch, seed starting mix generally produces more consistent results when starting seeds indoors.
Can You Make Your Own Seed Starting Mix?
Many gardeners also like to make their own seed-starting mix at home. A simple homemade mix often includes peat moss or coconut coir combined with vermiculite or perlite to create a light, well-draining blend.
Making your own mix can be a great way to save money, especially if you start a large number of seedlings each year.
No matter which option you choose, the goal is to use a soil mix that stays light, moist, and well-drained so young seedlings can develop strong roots from the very beginning.
Lighting for Indoor Seedlings
Once you have your seeds and trays, the next step is to determine how you will provide enough light. This is one of the most important things you can do to grow strong, healthy seedlings, and this is why I have chosen to use grow lights.
Young plants naturally stretch toward light as they grow. If they don’t receive enough light, they can become tall, thin, and weak. This is often referred to as leggy seedlings, and it is one of the most common problems gardeners face when starting seeds indoors.
Providing strong, consistent light helps seedlings develop sturdy stems and healthy leaves.

Growing Seedlings in a Window
A bright window can sometimes work for starting seeds indoors, especially if you have a large south-facing window that receives several hours of sunlight each day.
However, even sunny windows may not provide enough consistent light during late winter and early spring when many gardeners begin starting seeds. Because of this, seedlings grown only in a window may begin to stretch as they search for more light.
If you are using a window, rotating your seed trays every day can help prevent seedlings from leaning in one direction as they grow.
Using Grow Lights
Many gardeners find that using simple grow lights produces stronger, healthier seedlings.
Grow lights provide consistent light and allow you to control exactly how close the light is to your plants. Seedlings grow best when the light source is positioned just a few inches above the tops of the plants. As the seedlings grow taller, the lights can be raised to maintain the proper distance.
The goal is to give seedlings 12–16 hours of light each day, which mimics the long daylight hours they would naturally receive later in the spring.
Even basic shop lights with LED or fluorescent bulbs can work well for starting seeds indoors and are often an affordable option for beginners, but using full-spectrum grow lights is one of the easiest ways to ensure your seedlings receive enough light, and these grow lights from Amazon won’t break the bank either. They are simple to set up and provide the consistent light young plants need to grow strong, sturdy stems.
Giving Seedlings the Best Start
Whether you choose a sunny window or grow lights, the key is to make sure seedlings receive consistent, strong light every day. When seedlings receive enough light from the beginning, they are far more likely to grow into sturdy, healthy plants that transplant well into the garden.
How to Start Seeds Indoors: A Simple Beginner’s Guide to Growing Strong Garden Seedlings
Step 1 – Dampen Seed Starting Mix
Begin by dumping your seed starting mix into a large tote and wetting it. You don’t want your soil to be soaked, but you want it to be wet enough to stick together. Once this is achieved, start to fill your seed trays or containers. Gently add the soil to each cell or container and lightly press it down so the surface is level, but avoid packing it too tightly. Seedlings need loose soil so their small roots can grow easily.
Starting with slightly damp soil helps ensure the seeds have the moisture they need to begin germinating.

Step 2 – Plant Seeds at the Correct Depth
Different seeds need to be planted at different depths, so it’s always a good idea to check the instructions on the seed packet before planting.
As a general rule, seeds should be planted about twice as deep as the seed is wide. Very small seeds often only need to be pressed gently into the soil rather than buried. Larger seeds can be covered with a thin layer of seed-starting mix.
After placing the seeds in the soil, lightly cover them or gently press the surface of the seed to make good contact with the soil.
H3: Step 3 – Water Seeds Gently
After planting your seeds, water them carefully so the soil becomes evenly moist without washing the seeds away. The best way to do this is by using a spray bottle with a mist setting. This ensures that the top of the soil is moist and that the seeds don’t get washed away.
Many gardeners prefer to bottom water their seed trays by placing them in a shallow tray of water and allowing the soil to absorb moisture from below. This is great to do after your seedlings have sprouted and have roots that can reach. I do not recommend bottom watering before your seedlings have sprouted.
During germination, the soil should stay consistently moist but not overly wet.
Step 4 – Provide Warmth for Germination
Most vegetable and herb seeds germinate best in warm soil. A room temperature between 65–75°F (18–24°C) is ideal for many common garden crops.
Placing your seed trays in a warm location in your home and using the tray lids is often enough to encourage germination. Some gardeners will l use heat mats to gently warm the soil and help seeds sprout more quickly if their seed trays are placed in a cooler location like an unfinished basement or garage
Once the seeds begin to germinate and sprout, it’s important to remove the tray lids. This will help to prevent excessive moisture, allow airflow, and avoid fungal diseases.
Step 5 – Give Seedlings Plenty of Light
Before your seedlings even emerge from the soil, they need plenty of light to sprout and grow properly.
Without enough light, seedlings may stretch toward the nearest light source and become thin and weak. Position your grow lights a few inches above the tops of the plants so they receive strong, consistent light each day.
Most seedlings grow best when they receive 12–16 hours of light daily, which helps them develop sturdy stems and healthy leaves.
The best way to ensure you seedling have enough light is to invest in full-spectrum grow lights.

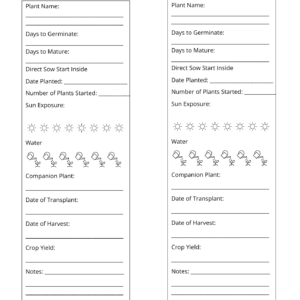
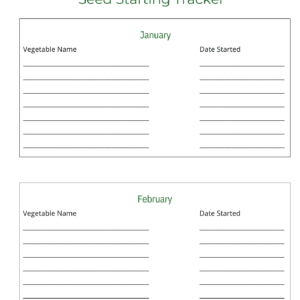
Step 6 – Label and Date Your Seedlings
Labeling your seedlings may seem like a small step, but it can save a lot of confusion later on, take it from me. Ha.
When seedlings first emerge, many plants look very similar, making it difficult to remember what was planted in each container. Using simple plant markers, labels, or even popsicle sticks will help you keep track of each variety as your seedlings grow.
Taking a moment to label and date everything at the beginning will make transplanting and garden planning much easier later in the season. You will be able to use the date to know when each seed was planted and ensure it has sprouted in the time frame it should have. This will help you to know if you need to replant anything.
How to Care for Seedlings After Germination
Once your seeds have sprouted, your focus shifts from germination to growing strong, healthy seedlings.
This stage is where many beginner gardeners run into challenges, but with a few simple habits, you can help your seedlings thrive
How Often to Water Seedlings
Seedlings need consistent moisture to grow properly, but too much water can cause problems.
The goal is to keep the soil evenly moist, not soggy. Overwatering can lead to issues like mold or damping off, while letting the soil dry out too much can stress young plants.
Many gardeners find that bottom watering works best. This allows the roots to absorb water from below while keeping the surface of the soil from becoming overly wet.
Most seedlings will not need to be watered daily until they are much bigger. Keep a close eye on them and only water when the soil is dry.
Preventing Leggy Seedlings
Light is one of the most important factors in growing strong seedlings.
If seedlings do not receive enough light, they can become tall, thin, and weak — a problem known as leggy seedlings.
Keep your grow lights just a few inches above the tops of your plants and aim to provide 12–16 hours of light each day. Consistent light helps seedlings grow compact and sturdy.
If you are using a south-facing window instead of grow lights, rotating your seedlings daily can help to prevent your seedlings from becoming leggy.
When to Thin Seedlings
It can be hard to do, but thinning seedlings is an important step.
When multiple seeds sprout in one cell, they compete for nutrients, water, and space. Removing the weaker seedlings allows the strongest plant to grow properly. The best time to thin is when they are very young, typically just after they develop their first set of “true leaves.”
Instead of pulling seedlings out, it’s best to snip them at the soil line to avoid disturbing the roots of the remaining plant.
Print off this Seedling Care Pocket Guide for a quick reference you can print and keep beside your seedlings.
Hardening Off Seedlings Before Planting Outside
Before moving your seedlings out into the garden, there is one final step that helps ensure their success: hardening off.
This is a simple but important process that allows your plants to gradually adjust to outdoor conditions.
What Is Hardening Off?
Hardening off is the process of slowly introducing your indoor-grown seedlings to the outdoors. Yes, you must do this even if you have a greenhouse.
Seedlings that have been growing inside are used to a very controlled environment. They have been protected from:
- strong sunlight
- wind
- temperature fluctuations
- rain
If they are moved directly from indoors to the garden, the sudden change can shock the plants and cause damage.
Hardening off gives seedlings time to adjust so they can handle life outside.
Why Hardening Off Matters
Skipping this step can lead to weak, damaged, or even sunburnt plants, even if your seedlings looked healthy indoors.
Without hardening off, seedlings may experience:
- sunburn on their leaves
- wilting or drooping
- slowed growth
- transplant shock
In some cases, plants can struggle to recover or stop growing altogether.
Taking a little extra time to harden off your seedlings helps them develop stronger stems, thicker leaves, and better resilience once they are planted in the garden.
How to Harden Off Seedlings
Hardening off is done gradually over the course of about 7–10 days.
Start by placing your seedlings outside in a sheltered location for a short period of time, then slowly increase their exposure each day.
A simple approach looks like this:
- Day 1–2: 1–2 hours outside in a shaded, protected area
- Day 3–4: 3–4 hours with some indirect sunlight
- Day 5–6: Half a day outdoors with more sun exposure
- Day 7–10: Full days outside, including direct sunlight
Bring your seedlings back inside each night, especially if temperatures drop.
By the end of this process, your plants will be ready to be transplanted into the garden.
A Simple Tip for Success
Try to avoid placing seedlings outside on very windy or extremely hot days during the first few days of hardening off.
Choosing mild, calm days will help your plants adjust more easily and reduce stress.
Common Mistakes When Starting Seeds Indoors
Starting seeds indoors is a simple and rewarding process, but there are a few common mistakes that can make it more challenging than it needs to be. The good news is that most of these are easy to fix once you know what to look for.
Starting Seeds Too Early
It’s tempting to start seeds as early as possible, especially when you’re excited for the gardening season. However, starting too early can lead to plants becoming too large before it’s warm enough to move them outside. If this happens, you will have to up-pot your seedlings to ensure they don’t become root-bound.
Overgrown seedlings can become root-bound or stressed, making transplanting more difficult. It’s best to follow a seed starting timeline based on your last frost date.
Not Providing Enough Light
One of the most common issues is not giving seedlings enough light.
Without strong, consistent light, seedlings will stretch and become tall and weak. This is known as leggy growth and can make plants more fragile when transplanted outdoors.
Using grow lights is one of the best ways to ensure your seedlings are getting enough light while giving you peace of mind from having to remember to rotate them in a windowsill.
Overwatering Seedlings
Seedlings need consistent moisture, but too much water can cause serious problems.
Overwatering can lead to damping off, a fungal issue that causes seedlings to suddenly collapse and die. It can also lead to mold forming on the soil surface.
Allowing the top of the soil to dry slightly between watering and ensuring good drainage can help prevent this. The best way to keep track is with a watering tracker so that there is no guessing when to water next.
Not Labeling Seedlings
It may seem like a small detail, but forgetting to label your seedlings can quickly become confusing.
Many young plants look very similar, and it can be difficult to tell them apart once they begin growing. Labeling your seedlings from the start saves time and prevents mistakes later on.
Skipping the Hardening Off Process
Moving seedlings directly from indoors to the garden without hardening them off can shock the plants.
This sudden change in environment can cause wilting, sunburn, or slowed growth. Taking the time to gradually introduce seedlings to outdoor conditions helps them adjust and thrive.
Frequently Asked Questions About Starting Seeds Indoors
Starting seeds indoors often comes with a lot of questions, especially if it’s your first time. Here are some of the most common questions gardeners like me get asked.
How early should I start seeds indoors?
Most seeds are started 4–10 weeks indoors before your last frost date, depending on the type of plant.
Crops like peppers and celery need a longer growing period, while others like tomatoes can be started a little later.
Do I need grow lights for seedlings?
Grow lights are not always required, but they do make a big difference.
A bright, south-facing window may work, but many gardeners find that grow lights provide more consistent results and help prevent leggy seedlings.
Why are my seedlings leggy?
Leggy seedlings are usually caused by not enough light.
When seedlings don’t receive enough light, they stretch toward the nearest source, resulting in thin, weak stems. Moving your light source closer or increasing light exposure can help fix this.
Can I start seeds in egg cartons?
Yes, you can use egg cartons to start seeds, and they can be a great budget-friendly option, especially if you’re just getting started.
Cardboard egg cartons work best because they are biodegradable and allow for good airflow. They’re ideal for starting a small number of seeds and are easy to cut apart when it’s time to transplant.
Can I reuse seed starting trays?
Yes, seed trays can be reused year after year.
It’s a good idea to clean them between seasons to prevent the spread of disease. Reusing trays is one of the easiest ways to keep seed-starting costs down.
Starting seeds indoors is one of the most rewarding steps you can take in your garden. It allows you to grow a wider variety of plants, save money, and get a strong head start on the growing season. With just a few simple supplies and a little daily care, you can raise healthy seedlings that are ready to thrive once they’re planted outside. If you’re feeling inspired to take this even further, my Seed to Harvest PDF Bundle was created to guide you through the entire process—from planning and seed starting to transplanting and harvesting. It’s a simple, practical resource designed to help you grow with confidence and make the most of your garden this season.


How to Start Seeds Indoors: A Simple Beginner’s Guide to Growing Strong Garden Seedlings
This comprehensive bundle is your ultimate guide to mastering every aspect of the gardening process. Whether you’re a seasoned gardener or just starting, “From Seed to Harvest” has something for everyone. Inside, you’ll discover:
- Expert Tips and Tricks
- Comprehensive Planting Guides and Work Sheets
- Step-by-step Directions

Leave a Reply